The import tool can be used for adding multiple Contacts to your Capsule account at once. You can find it directly on the People & Organisations tab by choosing the Import Contacts button from the top of the screen, which will take you to the Import hub.
From there, click on From a File and then the People & Organisations option to get started.
How to import Contacts from a CSV or Excel file
This is one of the most common ways to get your data into Capsule. If you’ve used a CRM previously, or have your data stored in a different service it is likely you will be able to export that to a CSV or Excel file. The key to importing this successfully into Capsule is first preparing the data, then setting up Capsule to support all of your data fields.
Step 1: Decide where your data is coming from
If you already have a list of contacts (for example, from Google or LinkedIn), we have some dedicated guides for how to export contacts from these popular tools to a CSV file - which you in turn can use to import as per the steps below:
Step 2: Organizing your spreadsheet for import - Creating People vs Organization records
When you import from a CSV or Excel file, Capsule will look at each row and use specific fields to create either a Person or an Organization record. If you’re planning to store details against both People and Organizations, they’ll need to be on seperate rows in your spreadsheet.
- Creating a Person: If the row has a first and/or last name then Capsule will always use that row to create a person. It will also add all the remaining contact details on the same row to that person.

- Linking the Person to their Organization: Add an Organization column to the Person row to show where they work and link them up in Capsule.

- Adding details to the Organization record: If you do not want to add details to the Organization record, you do not need to do this step. This is because an Organization record (e.g. Bookingly) will be automatically created when importing and all of the people linked to it.
If you want to add details to the Organization record itself, you only need to have the Organization column populated on that row, plus any other columns on that row that you’d like to store on the Organization. Make sure to leave the first name and last name columns blank:

Below is an overall example of how the spreadsheet can be set up to create multiple People and their Organizations and store details on both record types.

Step 3: Getting the fields right for import
Most fields are straight forward but it's good to understand how some fields might need specific formatting.
- First & Last Name/Organization: Find out more in Step 2 - Creating People vs Organizations.
- Address: Capsule uses a single field for the street in the address meaning that your file needs to have a single column for the Street. You can still use multiple lines within the address for things like apartment numbers etc. They just need to be in the same cell, separated with a line break. Remaining fields like city, zip etc should all have their own columns in the file.
- Tags: You can add these to your contacts in two ways, find out more in the importing Tags section.
- Custom Fields: Depending on the type you choose, Custom Fields will be formatted differently. Read more on how to do this in the importing Custom Fields section.
- DataTags: DataTags will need to be added to the Tags column, with extra fields for each Custom Field within. Find out more in our dedicated section on importing DataTags.
- Notes: Notes can be imported but are best formatted in a certain way to ensure that they are separated out and have the correct dates against them. Learn more in our dedicated section on importing history.
Example Contact Import Template
See the example below for how all these things can be set up in your spreadsheet. Click here to download the sample file.

Step 4: Importing the file into Capsule
Once you have your files ready to go:
1. Go to the People & Organizations tab.
2. Click the Import Contacts button at the top-right of the screen.
3. Select From a File > People & Organisations.

4. Use the Click to upload button (or drag and drop your file), then click Next to get started.
5. Now you'll be asked to match up the columns in your file to the corresponding fields in Capsule. Capsule will try to automatically detect the right columns but please double check all columns to make sure it is correct. The 'Uploaded Sample Data' section shows what values from your file will be put into each field. At this point, you can also create your Custom Fields.
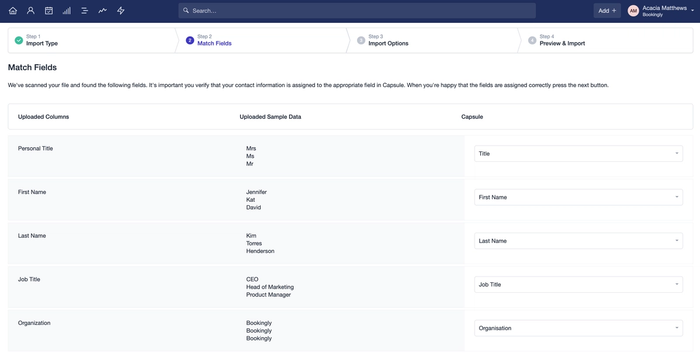
6. When you're done with your selection, click the Next button.
7. If Capsule has found duplicates in your file then you'll be presented with an option to choose how to handle those. You can either import them all as new contacts anyway, ignore the duplicates or choose the option to Import and update duplicates using the data from your file.
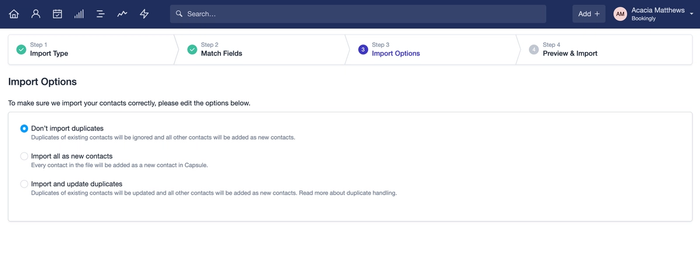
We have more details on this process in our dedicated section on updating contacts with an import.
8. Next you'll see a preview of the contacts that are about to be imported. Confirm that it all looks right and check to make sure that the number of contacts about to be created matches up with your expectations.
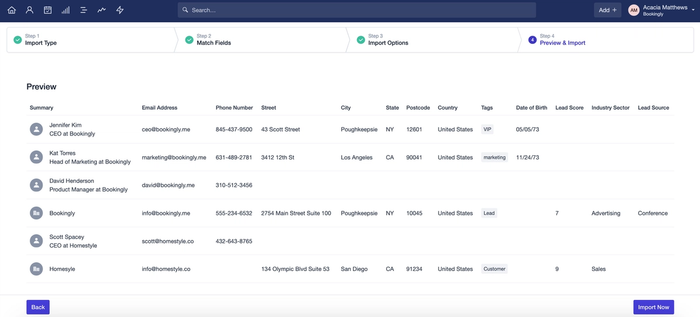
9. Finally click Import Now. Your import will start and you will be notified via email when it's complete.
Adding Custom Fields via import
Adding Custom Fields to your contacts is a quick and easy way to store unique information right from the start. Depending on the data type you want to add, there are some important details to note:
- Text: Text fields have a 250 character limit.
- Date: Choose one of the supported date formats for all dates in the spreadsheet out of dd/mm/yyyy, dd-mm-yyyy, mm/dd/yyyy, mm-dd-yyyy, yyyy/mm/dd or yyyy-mm-dd.
- Check Box: For checked, use Y or TRUE. For not checked, use N or FALSE.
- Number: Number fields have a 12 character limit with optional 3 decimal places.
- Single Select List: It is a single select field, so you will need to add the single value for that contact in their row. The value must match the list item (no typos).
- Multi Select List: Each value must match an existing list item exactly (no typos). If you’re selecting more than one value, include them in the same cell separated by a semi colon ;
Custom Fields are usually added in Account SettingsCustom Fields. If you are an Admin User, to make the process quicker, you can set up most Custom Fields when importing instead:
- At the matching fields Stage, click on the No Match Field
- Choose Add New Custom Field
- Fill in all of the details for it including the Type and Description
- Click Save
The field will then be created and once the import has finished, the information in the column for that field will be stored against your contacts.
Gif showing the user creating a Custom Date Field while importing
Adding Tags via import
Adding Tags to your contacts during import helps you to organize your contacts into manageable groups from the get go.
There are two ways to do this:
- The first is to add a single column called “Tags” and then add your Tags to each relevant contact as a comma separated list.

- The second option is to add a separate column for each Tag and just add the Tag in each row where you would like it to be applied. When you come to the mapping stage in Capsule, you will select the option to Apply as tag.

Adding DataTags via import
You will need to make sure the DataTag is set up in Account SettingsTags and DataTags first.
In your spreadsheet, you need to include the DataTag name in the 'Tag' column and then have a separate column for each Custom Field within the DataTag.
Then when importing, you can map to the right fields. For a DataTag called 'Lead' with a Custom Field in it called 'Source' you would map the Custom Fields like this:
A very descriptive description for the image
That will tag the contact with 'Lead' and add the values of Word of Mouth, Ad and Conference to the respective contact in the 'Source' Custom Field.
How to import history
When importing your contacts using the CSV or Excel import process you can also import notes & emails. To import multiple notes for the same contact and to set a date for your history entry there's some specific formatting you need to use:
*** NOTE ***
2020-01-01
First interesting note
*** NOTE ***
2020-03-20
Second interesting note
Emails can be imported with similar formatting - you just replace NOTE with EMAIL like this:
*** EMAIL ***
2020-02-28
First interesting note
- The note separator field must be formatted exactly as in the example without any extra or removed spaces.
- The date element is optional.
- Excel truncates fields to a relatively short limit of 32,000 characters. As a result Excel is unsuitable if you're generating CSV or Excel files with long note histories.
- For better control over note importing, consider engaging a developer to import the notes via the Capsule API.
Then during the import you map the history column in your file to 'add as note/history to contact' in Capsule.

How to assign users when importing
To assign Contacts to a specific User when importing, you will first need to add a column in your file with the header ‘Owner’. You can then add the username for the Capsule User you would like to assign each Contact to in each respective row.
Administrators on your account can find the username for each User by going to Account Settings > Users and Teams.
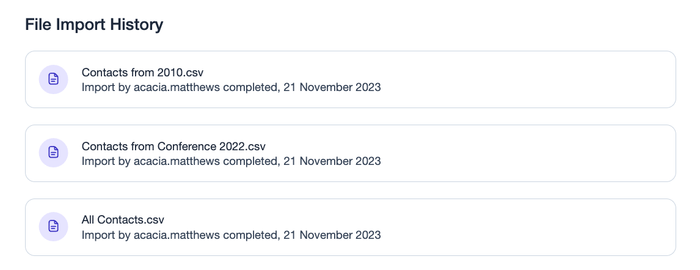
How to view last imports
After every import, you will get a confirmation email with a summary of the import and the link to view the imported contacts in Capsule. If you want to see a recent list of contacts that you've previously imported, this can also be done from within Capsule:
- Go to the People & Organizations tab
- Choose the Import Contacts button
- Scroll down to the File Import History section and click on your chosen import for more details
How to undo the last import
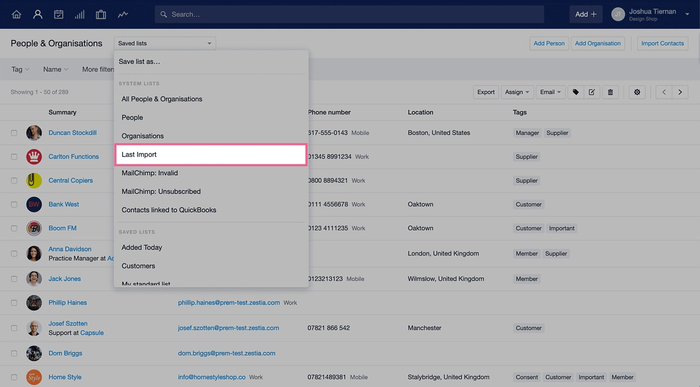
If you want to undo your last import for any reason, Capsule gives you the option to view the new contacts added in your last import which you can then delete in bulk. To do that, you should follow these steps:
- Go to the People & Organizations tab
- Select the import you want to undo from the saved lists at the top of the page
- Click the trash-can button at the top-right of the page to delete all the contacts in the list at once
CSV or Excel import troubleshooting
Failed Imports or Rows
Whether it’s your full import or a specific row, there are a few reasons that can cause them to have trouble importing into Capsule. After every Import, Capsule will generate a file of any rows that have failed or been ignored. This is called the Unhandled file.
To view the Unhandled file for a Contact import:
- Go to the People & Organizations tab
- Choose the Import Contacts button
- Scroll down to the File Import History section and click on your chosen Contact import
- In the yellow box, choose the button to download the file

In that Unhandled file, you will find a Reason column that gives more detail on why specific Contacts did not import. We have explained all reasons in the section below.
What does each reason mean?
Once you have downloaded the Unhandled file for your Contact Import - you will find a reason column, explaining why each row failed, or was ignored.
Below is an explanation of all possible reasons:
| Failed Reason | Explanation |
|---|---|
Invalid Email Address | For example, if any email addresses in the Email column do not include an @ sign. |
Duplicate Person | If you have more than one Person with the same First Name, Last Name and Email address in the same spreadsheet. |
Duplicate Organization | Organization names in Capsule are unique. If you are updating Contacts, see Updating contacts using the Import tool. |
Missing Name Fields | A missing First Name and/or Last Name on a Person row and/or a missing Organization name in the Organization column. See more details in Step 2 - Creating People vs Organizations. |
Duplicate Row | Where you have selected to ignore existing contacts and an existing contact has been found. |
Owner Not In Team | The chosen assigned owner/user isn't in the team. This only applies if you specify the Team in the row for that contact. |
Email Belongs To a User | Email addresses linked to a User cannot be updated by import. Read more about How to view and change the email address linked to your user. |
There are also situations where a Custom Field does not match your settings in Capsule. This includes the following reasons:
| Failed Reason | Explanation |
|---|---|
Invalid value for list | The entry in your spreadsheet is not part of the List Custom Field. For example, importing a value of C, when the List Custom Field only includes A or B. |
Invalid number for custom field | Custom Number fields have a 12-character limit with optional 3 decimal places. |
Invalid date field/format | You must choose one of the supported date formats for all dates in the spreadsheet out of dd/mm/yyyy, dd-mm-yyyy, mm/dd/yyyy, mm-dd-yyyy, yyyy/mm/dd or yyyy-mm-dd. |
Custom field specified is for organisation only | The Custom Field in the spreadsheet is added to a Person, but the field itself is set up for Organisations only. |
Custom field specified is for person only | The Custom Field in the spreadsheet is added to an Organisation, but the field itself is set up for People only. |
Deleted after import | The Custom Field has been deleted after the import was completed. |
The following only applies if you are using the Contact ID column to update contacts by import:
| Failed Reason | Explanation |
|---|---|
PartyDeleted | Capsule is unable to find the contact as it has been deleted. |
PartyNotFound | Capsule isn’t able to find the contact to update it. |
If you need some extra support to find out, you can email support@capsulecrm.com with a copy of the file for more information.
Question marks or strange characters in the import
Capsule assumes that CSV files are in UTF-8 format which allows you to store details about your contacts using characters from most of the world’s languages. However some applications save files in a format specific to your location.
You can usually convert these files to UTF-8 format using a simple text editor. On Windows you can use Notepad, and on Mac OSX you can use TextEdit. Then follow these steps:
- Open the CSV file in your text editor
- Select 'Save As' from the file menu
- Select Unicode (UTF-8) from the text encoding menu in the Save as dialog box