Starting a business usually begins with one big idea… and a hundred small questions.
What comes first? How do I register a name? What if I miss something important?
Most small business owners start without a clear roadmap, and that’s completely normal. But a few practical steps can go a long way in replacing second-guessing with progress.
This guide walks you through every step. From refining your idea to making your first sale. If you're feeling stuck or unsure where to begin, you're in the right place.
Step 1: Refine and validate your business idea
A strong idea solves a real problem, and you don’t need a business degree to test if yours does.
Start by getting outside your own head. The best way to refine your idea is to see how real people respond to it.
Here’s how to validate your idea without overthinking it:
🔎 Talk to potential customers
Ask people who might actually use (or pay for) what you’re planning:
- What’s your biggest frustration when it comes to [insert problem]?
- Have you tried anything else to fix it?
- Would you consider paying for [your proposed solution]?
Even three to five honest conversations can shape the direction of your business.
🧪 Run a basic smoke test
Put up a landing page describing your business. Include a form where people can sign up for updates or pre-orders. Share it in a local group or community forum.
- If people click or sign up, you're on the right track.
- If they bounce, revisit your message or offer.
🔍 Check demand with simple tools
Before investing time or money, see if people are already looking for what you want to offer. Tools like Google Trends can show what’s rising in popularity — and where.
Let’s say you’re thinking about starting a baby product business.
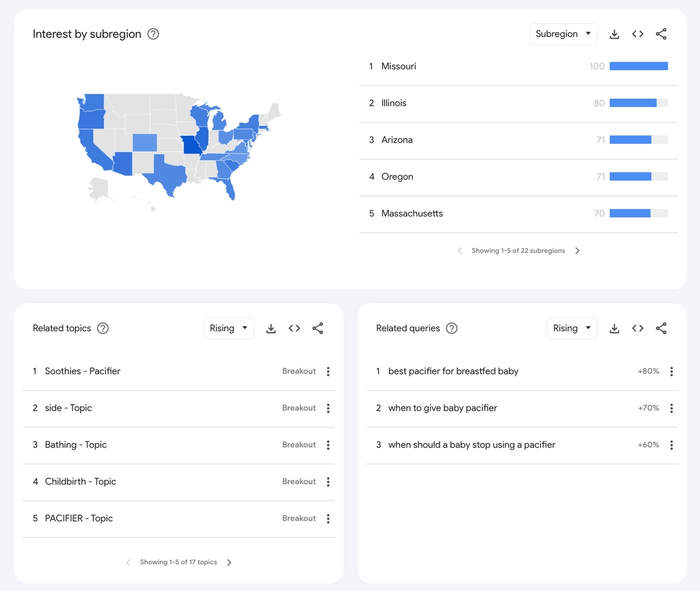
You might discover rising interest in things like:
- 'best pacifier for breastfed baby'
- 'when to give baby pacifier'
- 'when should a baby stop using a pacifier'
That tells you there’s active demand and specific pain points you could build around. Look for keywords, trends, and questions that signal what people care about, and then shape your offer to match.
Sometimes your best research comes from listening. In the pacifiers’ case, parents talk candidly in Reddit threads, Facebook groups, and parenting forums about what they actually use – and what they worry about.

In just one Reddit thread, parents shared that:
- They prefer pacifiers over thumb-sucking because it’s easier to wean later.
- Dentists sometimes encourage pacifier use to prevent SIDS.
- Soothing to sleep is a top use case, but losing the pacifier overnight is a common issue.
This kind of input helps you spot recurring pain points and beliefs. You might discover there's room for a pacifier that solves a specific problem, like staying in during sleep, or easing weaning at a certain age.
🧠 Pro tip: Pay attention to the exact words people use. If one parent says 'I was worried about my baby getting hooked on it,' you’ve just found language that could shape your product messaging or website copy.
Step 2: Write a business plan
A business plan isn’t about impressing anyone. It’s a tool to help you make decisions, spot gaps, and stay focused.
You don’t need a long document. But you do need clear thinking in a few key areas:
What to include in your plan
- Overview: What are you building? Who is it for? Write 2–3 lines that describe your business in plain language.
- Customer + Market: Who’s your customer, and what are they struggling with right now? What other businesses serve them? Where will you stand out?
- Your offer: What exactly are you selling? How does it solve a specific need? Why will people choose it?
- How you’ll reach them: How will your customers hear about you (social, SEO, referrals, in-person, something else)? Be specific.
- Startup costs + pricing: What will it cost to open your doors? How will you price your product or service, and what’s your break-even point?
- Next 90 days: What does success look like in your first 3 months? Try one or two measurable goals: 'Launch landing page by June,' 'Get 20 email signups,' 'Sell first 10 units.'
💡Planning matters. Research shows that small business owners with a solid plan are far more likely to succeed. If you're not sure where to start, try this small business action plan template. It helps you lay out the essentials on a single page, without getting stuck in planning mode.
Step 3: Calculate costs and plan your funding
Every business is different, but here are rough estimates to help you plan.
Must-haves for most businesses
- Business licenses and permits: These usually range from $50 to $400, depending on your location and industry.
- Basic insurance: Expect to pay between $300 and $1,200 per year for general liability coverage.
- Website and domain: You can get started for around $100 to $500 using a template builder like Squarespace or Shopify.
- Essential tools or equipment: Budget at least $500–$3,000, depending on what you need to operate.
- Initial inventory or materials: For product-based businesses, set aside $500–$2,000 to stock up.
- Marketing basics: Around $100–$500 can cover early ads, flyers, or a launch promo.
- Payment systems: Tools like Square or Stripe are often free to start (yet you have to pay transaction fees), with optional add-ons around $300.
Nice-to-haves (that can usually wait)
- Custom branding or design work: A professional logo or website design can run from $500 to $1,500 or more.
- Premium tools or software: Consider starting with free or low-cost versions and upgrading later.
- Professional photography, influencer marketing, or custom packaging: These can help your brand, but aren’t essential from day one.
Add a 10–15% buffer to your estimate for unexpected fees or last-minute purchases. It’s surprisingly easy to overlook things like business cards or small equipment.
Step 4: Choose a structure and register your business
This is the part where things get official. It might feel like paperwork, but registering your business gives you a foundation and protects you from headaches later.
For most small business owners, this step means two things: choosing a structure that fits your setup, and getting your legal basics in place.
Choosing your business structure
You don’t need to overthink this. For most new businesses, one of these two is a solid start:
- Sole proprietorship: the simplest option if you’re working solo and starting small. It’s fast to set up, but your personal and business finances stay linked.
- LLC (Limited Liability Company): a bit more setup, but gives you personal liability protection and keeps your finances separate. It’s a popular pick for service providers, shop owners, and consultants.
Other options like partnerships and corporations are out there too, but unless you have co-founders or investors lined up, most new business owners don’t need them.
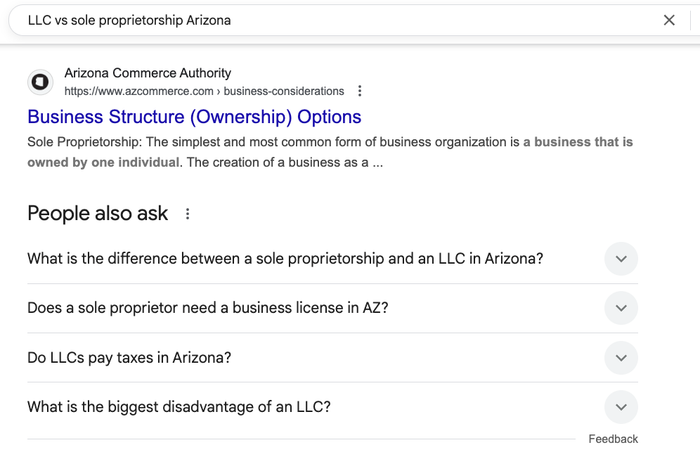
If you’re not sure, search 'LLC vs sole proprietorship [your region]' or ask a small business advisor in your area.
Registering your business step-by-step
Once you've picked a structure, here’s what to do next:
- Choose and register your business name. Make sure your name is available in your state. You’ll usually register it through your Secretary of State or local government website.
- Get your EIN (Employer Identification Number). This is your federal tax ID — like a Social Security Number, but for your business. You’ll need it to open a bank account, file taxes, or hire staff. Apply free online at irs.gov.
- Check license and permit requirements. These vary depending on what you’re doing and where. For example, selling food, offering childcare, or handling products may need extra approvals. Your city’s business office or the SBA license tool is a good place to start.
Step 5: Protect your business with the right insurance (if needed)
This is one of those steps that’s easy to push down the list, until something goes wrong. Getting insured early helps protect your work, your reputation, and your bank account.
Depending on what you do, you may need a specific type of coverage before you can launch:
- General liability insurance – Covers customer injuries or accidental damage (like if you spill coffee on someone’s laptop during a meeting).
- Professional liability insurance – Also called errors & omissions (E&O). Useful if a client claims your advice or deliverables caused them a loss.
- Commercial property insurance – Covers your gear, tools, or stock, even if you work from home.
What you might need, based on your business:
- A coach might want professional liability coverage in case a client disputes the results.
- A tradesperson often needs general liability to work in client spaces.
- A product-based business might insure inventory or expensive equipment.
- A pop-up or market vendor may need coverage to rent event space.
Insurance is more than just red tape. It shows clients you’re serious, helps you stay legally compliant, and protects you if things go sideways.
Step 6: Set up the systems you’ll use every day
As your business gets going, it’s easy to lose track of what’s been done and what’s still outstanding. Without a system in place, payments can slip, customer conversations go quiet, and important work gets delayed.
To stay organised from the start, focus on three areas that keep your business moving:
- how you handle money,
- how you track customer activity,
- and how you manage your workload.
Money
Open a business bank account before you take your first payment. It keeps your records clean and gives your business credibility when working with suppliers or applying for funding.
Pick a simple way to track income and expenses. Many small business owners begin with a spreadsheet or a free invoicing tool. You can upgrade later when things get more complex.
Action:
- Open a business bank account
- Choose a basic invoicing or expense tracking tool
- Create a ready-to-send invoice template
Customers
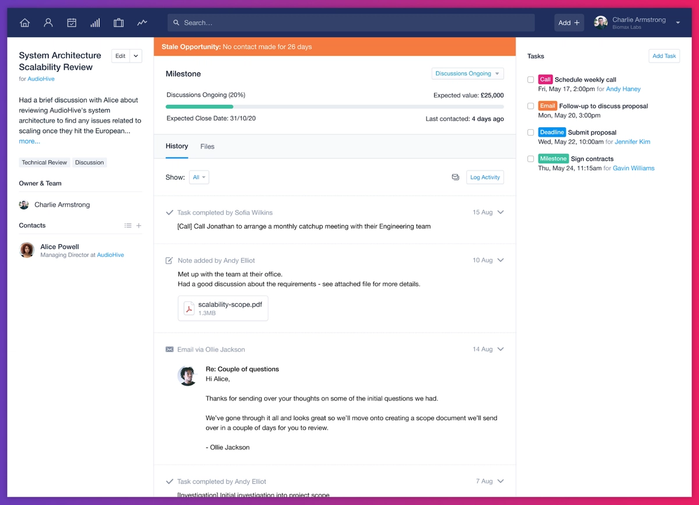
Once people start enquiring or buying, you’ll want a way to track your customer relationships. A CRM helps you keep a record of who you’ve spoken to, what they’re interested in, and what the next step should be.
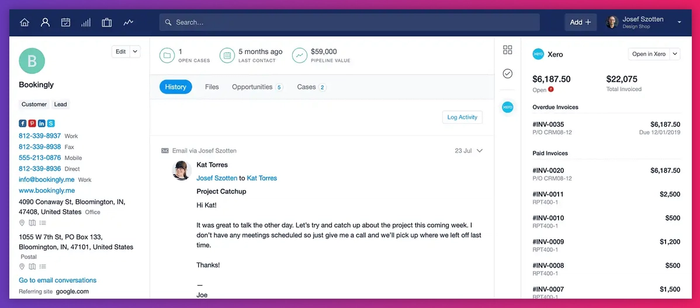
Capsule helps you organise contacts and set reminders so no conversation goes cold.
Action:
- Set up your Capsule account
- Add a few early contacts or leads
- Create a simple pipeline to match your sales process
- Add a follow-up task for at least one customer
Tasks
Every business needs a reliable way to stay on top of daily work. Use a calendar, a digital task list, or even Capsule’s task feature to plan what needs to happen and when.
Action:
- Pick one tool to manage your tasks
- Write down your top three to-dos for the week
- Set a recurring check-in each Monday to review and update your list
Step 7: Build a brand that feels real, before you spend a penny
You don’t need a polished brand identity to get started. But you do need to look like a real business: with a name people remember, a message they understand, and a presence that feels consistent.
Trust is the most important factor in building a brand: 95% of customers are likely or very likely to remain with a brand they trust, according to the Institute of Customer Service.
Here are a few free ways to build early brand trust, without hiring a designer or writing a brand manifesto:
Choose a clear, available name
Your name doesn’t need to be clever — it needs to be clear. People should understand what you do, or at least remember you after hearing it once.
Before you commit:
- Check domain availability on sites like GoDaddy or Namecheap
- Search Instagram, LinkedIn, and Google to see if it’s already in use
If your ideal name is taken, try adding your service, niche, or location to make it more specific.
Better name choices:
- Instead of Best Digital Brigade, go with Digital Bloom Leeds — clear, local, and brandable
- Instead of Bright, try Bright Accounting Co — more searchable and service-specific
- Instead of Crafted, try Crafted Interiors Manchester — relevant and easy to recall
Write a one-liner you can use everywhere
Describe what you do and who you help in a single sentence. This becomes your Instagram bio, your website intro, your pitch. It helps people 'get' your business in five seconds.
Create a basic, repeatable look
You don’t need to hire a designer or create a full brand guide. Most small businesses start with whatever they can pull together, and that’s completely fine! What matters is consistency.
Pick one clean, readable font. Use it everywhere — on your website, social posts, invoices, and any marketing materials. Google Fonts is free and has great options like Inter, Lato, or Raleway.
Choose one main colour that becomes your accent colour for buttons, links, headers, and backgrounds. Canva’s colour palette tool or Coolors.co can help if you want to test combinations.

Choose one version of the logo so your brand feels consistent wherever people find you. Canva comes with many free logo templates you can customize to your brand.

Add your font, colour, and logo to your website, social headers, Google Business Profile, email signature, and proposal templates. The repetition is what makes it feel professional.
Keep your tone consistent
Whether you’re replying to a DM or sending an invoice, the way you write is part of your brand. Decide if you’re casual, warm, direct, or friendly, and stick to it across channels.
None of this needs to be perfect. But when people see the same name, message, and style across channels trust starts to build, and that’s the purpose of branding.
Step 8: Launch and promote with purpose
You need to announce that you’re open, and create systems that won’t let you down once they show up. At this stage, it’s all about visibility and readiness.
Start by building quiet visibility
You don’t need a big announcement or a complex posting schedule. Even low-effort steps can create awareness and early traction.
- Update your personal email signature with your business name and a short one-liner. You likely email suppliers, friends, or local contacts — it’s a passive but steady way to signal that you’re up and running. It only takes a minute to set up. You can use this free email signature generator to create one in seconds.
- Create a 'coming soon' highlight on Instagram. Use it to collect your early posts and FAQs in one place, so new visitors can quickly understand what you do, even if you're not posting daily.

- Pitch your business to a local newsletter or community group. It could be a neighbourhood bulletin, a coworking space roundup, or even a Slack group. These spaces are often looking for small business stories to share.
- Ask five people you trust to share your business with someone who might benefit from it. Friends, past clients, old coworkers — personal recommendations go further than ads at this stage.
Test your launch setup like a customer
Before you post the big 'we’re live' update, run through a few key checks to make sure things work as expected.
- Pretend you’re a new visitor. Is it clear what you offer and how to buy or book?
- Test your payment system. Check that credit cards and email receipts are all functioning.
- Make sure your contact form or email address is active — and that someone (even if it’s you) is checking it.
- If you’re using delivery or pickup, double-check that the process is clear from the customer’s side.
Consider setting up an auto-reply for your inbox or chat — something friendly and simple like 'Thanks for reaching out! We’re in launch week, so replies might take a little longer, but we’ll get back to you within 24 hours.' It buys you breathing room if you’re managing it all solo.
Don’t forget yourself
The early rush of launch can feel like everything is urgent. One way to stay calm: build a simple checklist just for yourself.
Include basics like:
- Charge the card reader
- Prep opening-day stock
- Schedule your first launch post
- Set a reminder to check DMs, comments, or support emails
Step 10: Learn what’s working — and what needs fixing
You’ve launched — now it’s time to listen and adjust.
Your business will teach you a lot in the first few weeks. Customers will ask unexpected questions. Some things will take off faster than you planned. Others won’t land at all.
The best thing you can do now is pay attention to what’s happening and respond quickly when something’s off.
Here are a few early signals to watch:
You’re getting website traffic, but no one’s buying
Check if your pricing is clear, if your product descriptions match what people expect, or if your payment process works correctly. Ask a friend to try ordering — and watch where they hesitate.
People buy once, but don’t come back
You might need a better post-purchase experience. That could mean clearer delivery updates or a reminder to reorder. It could also mean what you’re offering isn’t yet sticky enough to create repeat behaviour.
Leads are going quiet after showing interest
Look at your follow-up process. Are you replying fast enough? Are you reminding them of next steps?
You’re getting good traffic and solid leads, but sales are slow
This is where tracking your pipeline helps. With Capsule, you can see which deals keep stalling and which ones move forward. That insight helps you adjust how and when you follow up, or whether your offer is landing the right way.
You’re closer than you think
Starting a business comes with a lot of moving parts — and it rarely feels tidy. But if you’ve made it through the steps above, you’re already ahead of most people who stay stuck at the idea stage.
Maybe you’ve sketched out your offer, talked to a potential customer, or picked a name that finally feels right.
Those steps matter. Each one gets you closer to opening your doors and serving real customers. You don’t have to map everything out at once: focus on what’s in front of you, and keep things manageable as you go.
Curious how Capsule could help you manage? Try for free now!