As well as storing your emails in Capsule, you can also link up your own email account and start sending emails to your contacts directly within Capsule, saving you switching to your email client and making your workflow even smoother. Capsule currently supports sending emails from Google Workspace, Gmail, Microsoft 365 and Outlook accounts.
Connecting your Personal Mailbox
Each User on the account needs to connect their own email account to Capsule. To do that, you would need to follow the steps below depending on where your mailbox is hosted. This can be either a Google or Microsoft account, or if it is hosted elsewhere - through SMTP. We have covered both methods below.
Setting up a Microsoft or Google-hosted mailbox
- Go to My PreferencesMy Mailbox Connections
- Select whether you would like to connect a Google or Microsoft account
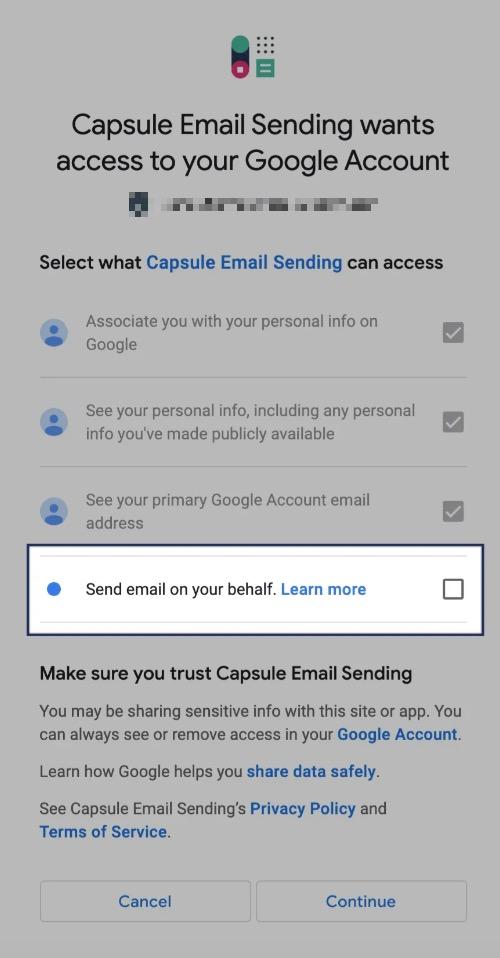
- Follow the steps to select the email account you want to connect and grant the permissions to allow the sending of emails via Capsule
- Some Google accounts may show a checkbox to allow Capsule to "send email on your behalf". If this is shown, you need to check this checkbox before clicking Continue in order to send emails through Capsule.

Setting up a mailbox using SMTP
If your mailbox is not hosted by either Microsoft or Google, you can still set it up to send emails through Capsule. This is done through a SMTP (Simple Mail Transfer Protocol) connection.
1. Go to My PreferencesMy Mailbox Connections
2. Select the option to Send emails with another email provider using SMTP
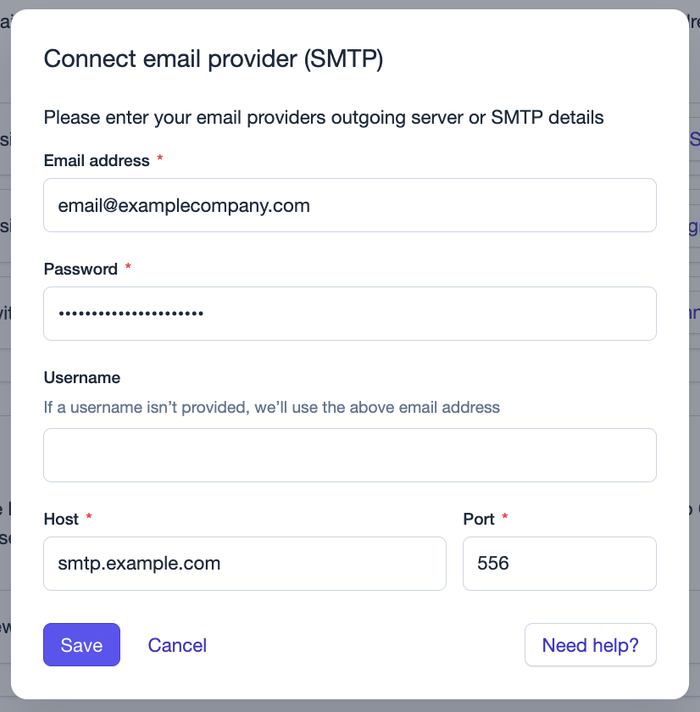
3. Enter the information for the mailbox you want to connect
- Email: The email address you want to send emails from
- Password: The password to log into the email address
- Username: This is the username for your mailbox and is dependent on your email provider/setup. It is usually the email address itself, so if that is the case then you can leave this field blank.
- Host & Port: These details are usually found in your mailbox settings. The exact location differs depending on your email provider - so we’d recommend checking their support documentation first.
Your details might be the Outgoing server in their documentation.
Sometimes your port number is combined with the host domain. For example, in smtp.example.com:556 - the Host is smtp.example.com and the Port number is 556. You do not need the colon.
If you’re still having difficulty finding this information, you can also email us at support@capsulecrm.com.
4. Once you have added all of the mailbox details, click Save to complete the connection.

Sending an email
Once your email account is connected, you will now be able to send emails directly from a Contact record. To do that, open up the Contact record that your email relates to and click the Send email button at the top of the activity section. This will open a new compose window.
Compose email window
The From: address will automatically be set as the email account you have connected. The To: address will be automatically populated with the first email address on the contact record. If the contact has more than one email address on their record, you can click the email address dropdown in the To: field and select a different email address.
Choose email from dropdown
If you want to add more recipients to your email, click the Cc Bcc link at the right of the To field to toggle on the Cc and Bcc field. Click either field and search for any contacts you want to add, then click the contact in the search results to add them as a recipient. When you start composing your email, the Cc and Bcc fields will be hidden again but you can toggle this back on using the same option above or by clicking the pill shown in the To field. If you want to remove a contact, simply click the x against their email address.
Add multiple recipients
Add your Subject and Message and use the formatting buttons at the bottom of the composer to add formatting to your message.
Your sent emails will be saved as normal in their respective sent folder in Gmail or Outlook, so you can always review what’s been sent by checking your sent items directly.
The maximum number of emails you can send per day is based on the limits set by Google and Microsoft. You can read more about the Google Workspace sending limits here and the Microsoft 365 sending limits here.
Sending emails from Opportunities and Projects
As well as being able to send emails from Contact records, you can also send emails directly from Opportunity and Project records in the same way. If you send an email from an Opportunity or Project, the default email address for the To: field would be the first email address available for the primary contact on that record. You can change this to any of the other email addresses for the primary contact by clicking the address in the To: field and selecting another address.
Inserting fields
You can insert fields into your emails which will pull data from the record that you are on and populate your email with those fields. You can add fields into the Subject field and the Message field. To do this, simply place your cursor where you want the field to be added and then click the Insert Fields menu at the bottom of the page and select the field you would like to add. You will see a preview of the text that will be added from the profile. This is useful for making emails more personalized by adding details such as the Organization name.
As well as being able to add fields attached to the contact, you can also add Sender fields which pull info from your own Capsule profile. This can be particularly useful for Administrators when creating email templates, as the template will then add the relevant information from each sender. This could be used as part of each user's email signature for example, by dynamically adding the name and job title of the sender.
Compose email window whilst inserting template fields
Fields can be added to emails sent from Contact records, Opportunities and Projects. The fields that are available are as follows:
Contact fields
- First name
- Last name
- Name (full name)
- Job Title
- Organisation Name
Sender fields
- Sender First Name
- Sender Last Name
- Sender Job Title
- Sender Phone Number
Opportunity fields
- Opportunity Name
- Expected Close Date
- Close Date
Project fields
- Project Name
- Close Date
Once your email is ready to go, you can click the Preview option at the bottom-right of the composer to see what your email will look like with the data from all the fields added.
Once you’re happy to send, click Send and the email will be sent.
How to use the AI Email Assist
Video showing how to compose an email using the Capsule AI Email Assist feature
When sending emails, you can use the AI Email Assist feature to help you write relevant emails in seconds, at the touch of a button. Tell our assistant what you want to write about, and it’ll do the rest for you. It’ll generate content that your customers will want to open.
To use the AI Email Assist:
- Click to Send Email for a Contact, Project or Opportunity.
- In the compose window, use the Write with AI icon in the bottom right corner to start the AI Email Assist.
- At this point the compose window will show a dedicated prompt bar at the top of the text area. Use this space to type in a prompt for what you'd like the email to say.
You can even specific details such as the tone and length. Some example prompts include:
- Send a short follow up email in a casual tone
- Send an introductory email in a formal tone
- Send a short friendly summary email of the following email notes: [copy/paste the notes] - Click the button to Generate and our AI Content Assist will generate an email based on your prompt. Tweak the generated content or prompt as needed inside the compose window.
What are the quotas for the AI Email Assist?
There is a limit to how many times you can generate content using the AI Content Assist, depending on your Capsule plan:
| Plan | Number of AI Content Assists |
|---|---|
Free | 10 |
Starter | 10 |
Growth | 1000 |
Advanced | 1000 |
Ultimate | 1000 |
How to disable the AI Email Assist
The AI Email Assist feature is enabled by default, but Administrators can choose to disable it if needed. To do this:
- In Capsule, go to Account Settings
- Click on Capsule AI
- Under the AI Email Assist section, untick the check box for Enable AI Email Assist
- Save your changes
Adding signatures
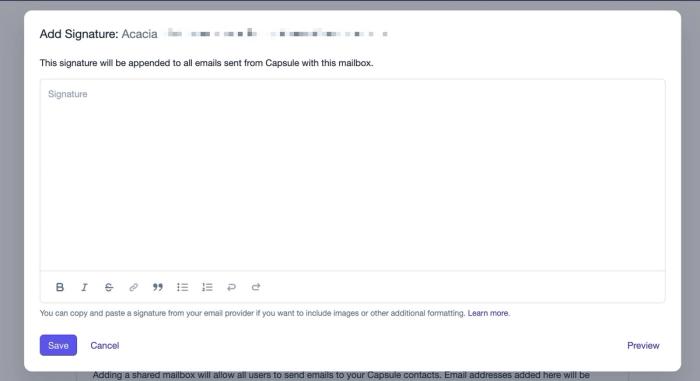
You can create one signature for each email account you connect to Capsule to save you manually adding it each time. To do this, go to My Preferences > My Mailbox Connections and click Add Signature on your connected Mailbox. In the compose window, create your email signature. You can paste images directly into the composer and add formatting using the options at the bottom of the screen. When you are happy with your signature, click Save.

You may already have an email signature setup in your own email client or service, in which case you can copy/paste the full signature into Capsule rather than manually recreating it. Here is an example of how that looks in Gmail
Copy and paste email signature with image
Once you’ve created a signature, it will automatically be added to every email you send from that email account via Capsule. You won’t see the signature when composing your email, but you can click preview in the composer to see how your email will look with the signature in place.
Preview with signature
Deleting signatures
If you want to remove your signature, you can do this by going to My Preferences > My Mailbox Connections and clicking Edit Signature on your connected Mailbox and deleting the signature from the composer and clicking Save.
Adding signatures to shared mailboxes
Administrators for the account can also set up signatures for shared mailboxes. This is done by going to Account Settings > Mailbox Connections and clicking Add Signature on the relevant mailbox. Again, this brings up a compose window where you can create your signature. Images can be pasted directly into the composer and you can add formatting using the options at the bottom of the screen. Once happy with the signature, click Save and the signature is ready to be used.
When a User switches from their own email account to a shared mailbox, the signature will automatically change based on which email account they are sending from.
Email Templates
Email templates are only available for paid accounts.
If you send similar emails to different Contacts on a frequent basis, you have the option to create Templates to speed up your process. These allow you to quickly select an email template when viewing a contact record and pull all the relevant fields from that record, making your outreach fast and personalized.
Each plan has its own limit of how many email templates you can setup:
| Plan | Email Templates |
|---|---|
Free | 0 |
Starter | 5 |
Growth | 50 |
Advanced | 500 |
Ultimate | 1000 |
Creating Email Templates
Templates can only be setup by Admins. To create an email template, go to Account Settings > Email Templates and click the button to Add Template.
Give the template a name to help you identify your templates when selecting them from the email composer. Choose a name that will make sense to all Users on the account. Then, just like composing an individual email, add your Subject line and Message and add any formatting using the formatting options at the bottom. Use the Insert fields button to add fields to the template.
Outlook and some other email clients use the subject line from an email to identify which email thread it belongs to. This can result in emails with the same subject being grouped together, which then results in them being stored against the wrong contact in Capsule. If you encounter this issue, you can resolve it by making your subject lines unique, perhaps by adding the contact's name as part of the subject too. You can do this by adding a field directly to the subject line of your email template so that each email you send has a unique subject.
Using Email Templates
When you open the compose email window on a contact record, you will notice a Templates button at the bottom-right of the modal window. When you click this, it will display a list of available templates. Select a template to add the template to the composer. Any fields that you have added to the template will be populated with the data from the contact record, allowing you to send the same email to different contacts but having it personalized each time.
Insert template
Adding Shared Mailbox Connections
Shared Mailbox Connections are only available for paid accounts.
If your team sends emails from a shared email address such as support@ or sales@, you can add this email account to allow all Capsule users to send from that email address. Since this affects all users, only Administrators on the account can set this up.
If you are an Admin, you can add a shared mailbox by going to Account SettingsMailbox ConnectionsShared Mailbox Connections
You will then need to set up the connection depending on the type of mailbox you have. The process for granting permissions will be the same as when you set up a Microsoft or Google-hosted mailbox or set up a mailbox using SMTP.
Once this done, users on the account will be able to select this email address in the From: field on any emails they send. If they don't have a mailbox connected, then the emails will be sent from the shared mailbox by default.
Each plan has its own limit of how many shared mailboxes you can setup:
| Plan | Shared Mailboxes Connections |
|---|---|
Free | 0 |
Starter | 1 |
Growth | 3 |
Advanced | 5 |
Ultimate | 10 |